Monday, December 10, 2018

Gingerbread House Advent Calendar

Happy Holidays to all! Here's a project I made with full intentions of having it done by December 1st. Well, it's December 10th and I just finished it last night. I will use the excuse that my 4-year-old grandson just moved back into town, and that I just took five days to go out of town with my daughter, or I could just say that I'm a really, really slow crafter! Probably a mixture of all of those things.
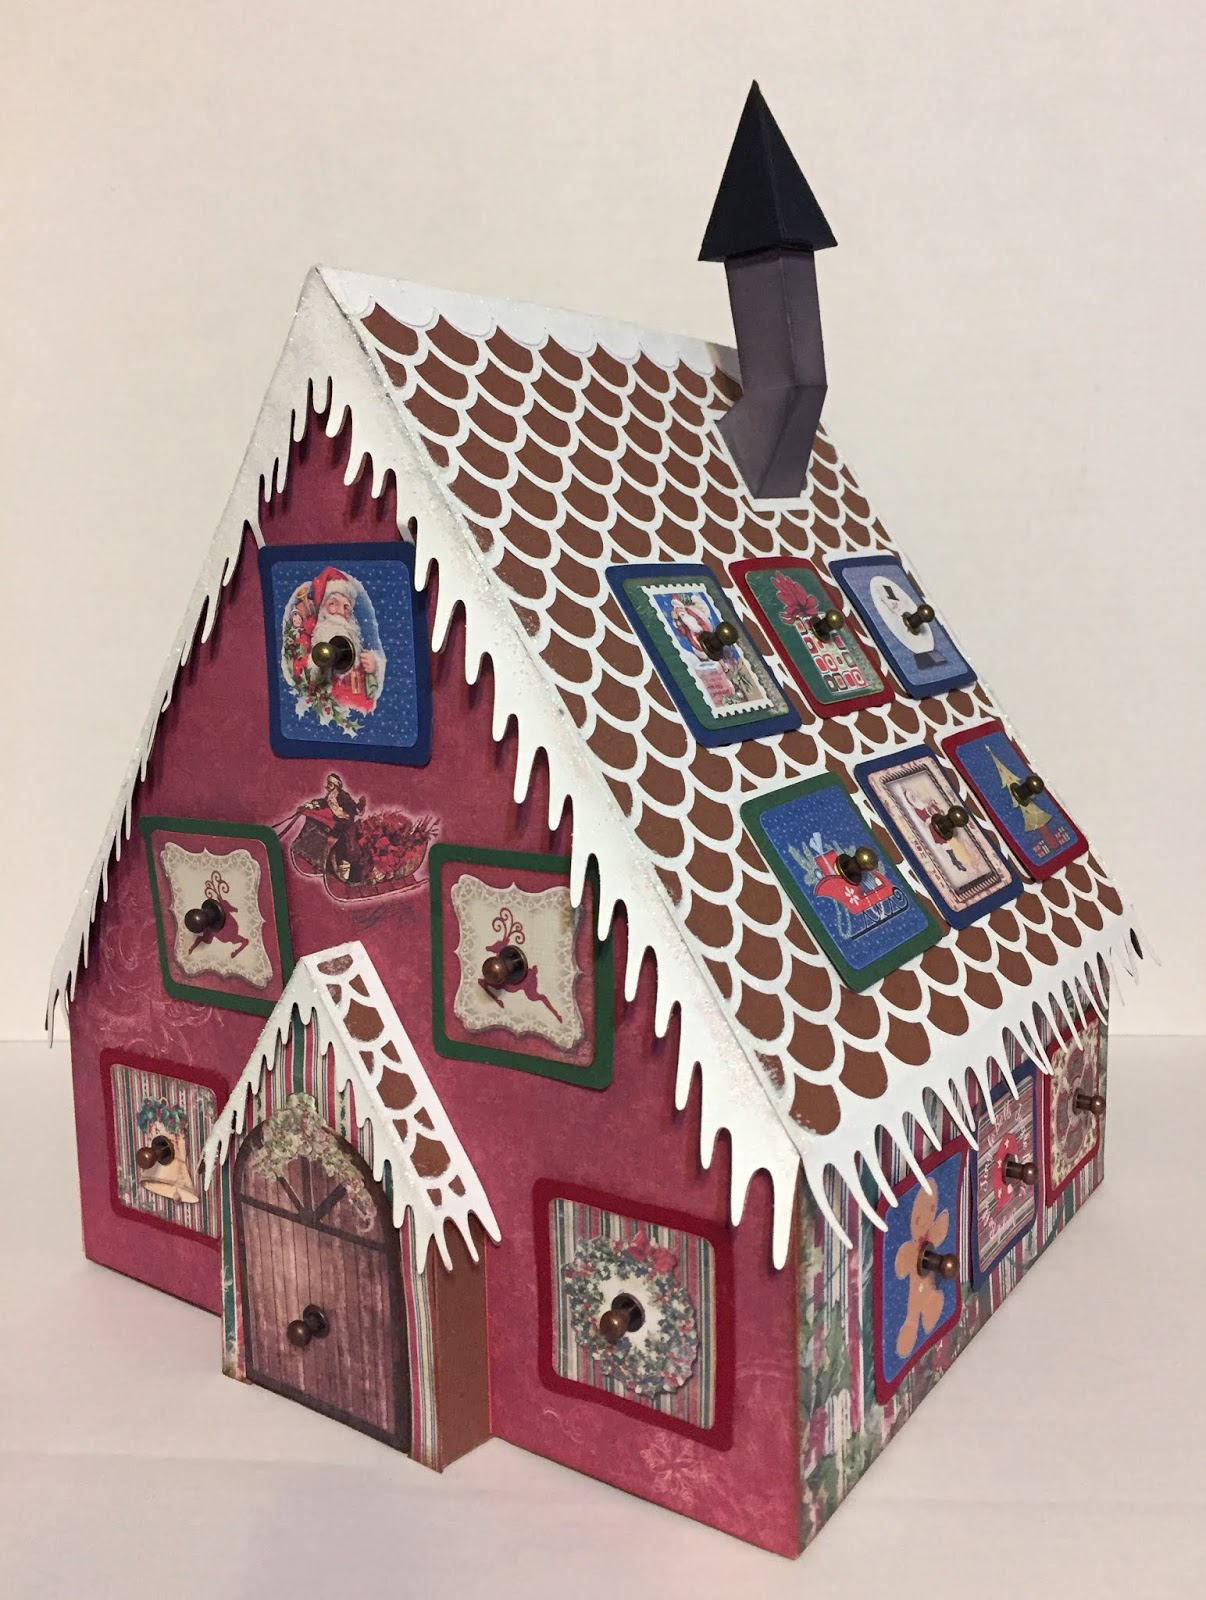
This gingerbread house was really fun to make. Surprisingly easy and very logical to make. It goes together really nicely. The svg pattern came from Bird's Cards, in her Countdown to Christmas bundle. As I commonly do, I had to put my own twist on it.
The basic pattern uses 25 pieces of cardstock and three pieces of glitter paper (or "snow"). I actually used quite a bit more, as I really wanted this to last and be substantial. The walls are two pieces thick with the base and the overlay, but I added inside layers all around so that it is at least 3 layers of cardstock all around (even more on the roof).
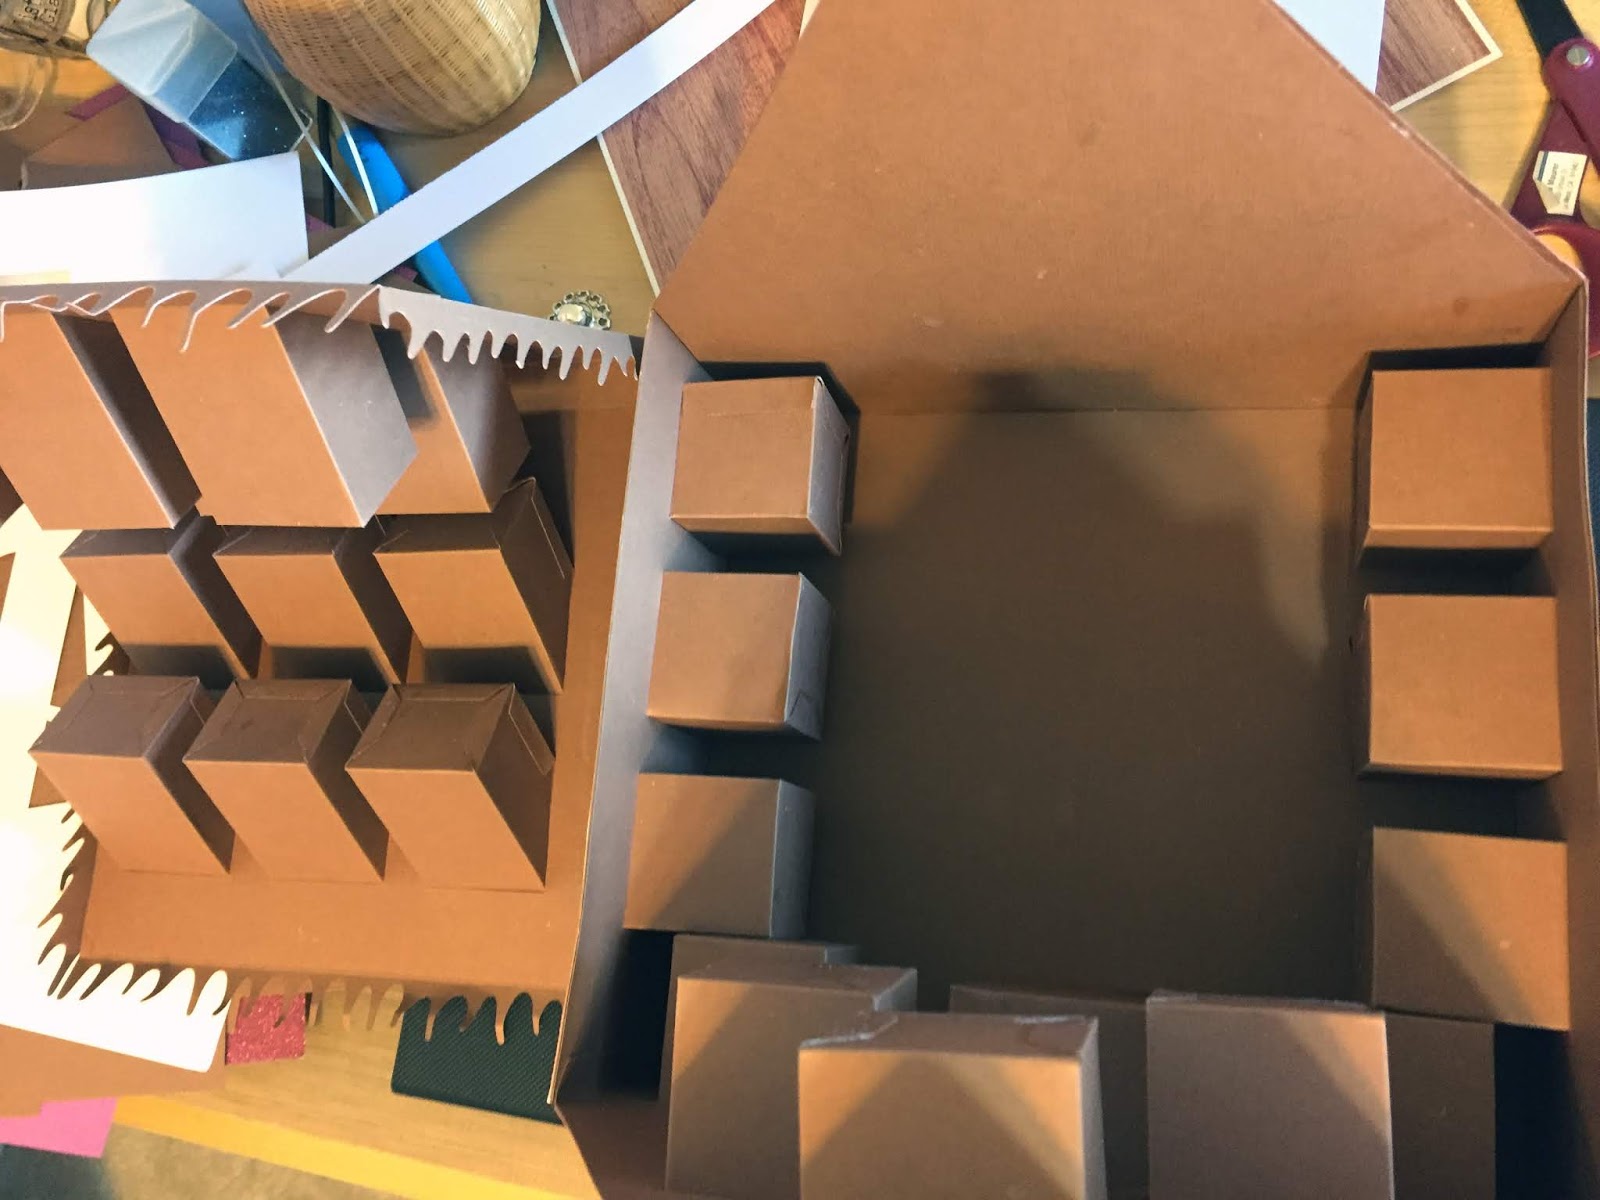
The inside of the box contains 24 boxes (the front door box is larger than all of the others). The boxes are closed on the outside, so that the inside where the drawers are inserted looks finished. There are lots of boxes to make when added to the drawers, but it's all very easy busy work; and the pattern is made so well that everything fits together like a glove.


Here's a view of the inside of the box that the drawer goes into..
All of the panels were printed with digital paper made by Bo Bunny. The side pieces were made from an altered piece of 12x12 digi paper that had embellished patterns on the upper right and lower left corners. I wanted those to be on the side, so I altered the paper so that I'd get those elements on both corners.
The front of the individual drawers have a solid color overlay, as well as an image layer. I made the image layer in Photoshop and made the cut file so that it had the center hole for the drawer pull at the same place. I cut them using print-2-cut in the ECAL software program for my Eclips2 cutter. Having the hole helped me line up the two pieces which I glued together. The drawer pulls are made by Tim Holtz, and were just perfect for this project. I happened to have just the amount that I needed in the correct colors for the project. I love when I can make a project with supplies on hand!

The front of the door drawer was made in Photoshop. I added some greenery at the top of the door image. Then I made a duplicate and flipped it horizontal. I did a print-2-cut and glued the two together, so that the image of the door shows on both the outside of the drawer and the inside. I didn't want any white cardstock showing. All of the drawers have been fully lined with another layer of the brown, so there is no place in the project where you can see any unfinished tabs showing.

I used other Bo Bunny images that were added onto the striped background paper for the back overlay. And, I wanted to add a chimney, so I found this stove pipe chimney in a Halloween cut file by Dreaming Tree. Had to do some manipulating and techniques to increase the size of the chimney and make the hole to fit them in the roof. It ended up with me adding even one more layer on the top. I think there are about five layers of cardstock there.
I want to put numbers on the drawers for the advent, but I haven't yet figured out exactly the best way to do it. I cut out some numbers in both silver and gold glitter, but wasn't crazy about either one. No hurry at this point, as I'm a bit late to use the house this year. I'm thinking a colored cardstock with a shadow color behind might be best.
The finished size is 11" wide, 10" tall (not counting the chimney) and 9" deep.
Thanks a lot for taking a look. I hope you enjoyed it even a small amount as much as I enjoyed making it!

Have Yourself A Merry Little Christmas!


Wednesday, November 14, 2018

Winter Sled Decor

I have been wanting to make this darling sled for some six years now. It was designed in 2012 by Thienly Azim, who was a DT for SVG Cuts. All portions of the sled were made from different kits from SVG Cuts. Back when it came out I had been 3D paper crafting for just a year or so, and was a bit intimidated to try it. But, I could never get it off of my mind, and finally jumped in. It ended up being pretty easy! And, having so many SVG Cuts' kits/collections now, I had every one needed to make it.
I love how this turned out. I added a few long square supports on the underside where the sled rails adhere to the cross supports to make it a bit more stable. I may have attached the rails at the wrong place, as I also had to build up the layers of the steering cross piece to make it look more proportionate.

Here's what the basic sled looks like before being embellished. Part of me really likes it just like this, as you can see the rivets and the wood grain so well.

But, you can't beat how Thienly designed the final sled. Instead of paper pine needles, I went with the real thing and went to my front yard and picked a sprig off of our overgrown pine tree. When, and if, they turn brown, I'll probably make the paper ones to replace it.

If you're interested in making this you can check out SVG Cuts' blog posting by Thienly back in 2012. It will list all of the kits used in making the sled, with all measurements and instructions included.

Next, I made a sturdy box in which to store the sled. Actually two of them, since I made a second sled as a Bunco gift. Here are the two boxes.


The finished sled is 9.5", so these boxes were custom made at 10.5"x5"x4.5", with three thicknesses of  80 lb card stock. Thanks for stopping by!

Time for Snow Play!


Monday, November 12, 2018

Twelve Days of Tags

We had another challenge on the Sizzix Eclips/Ecal FB page, this time to make 12 tags from any source using our Eclips cutting machine/software. We were to post one a day for the first 12 days of November. We posted our 12th tag today. I chose to do all of my tags using cutting files from SVG Cuts. I used multiple files types: cards,  boxes, bags,  box cards, flat collections, then took a single element (or two) and turned them into Christmas tags. The tags range from 3-1/4" to 6" tall.

Tag 1 (Reindeer) is from a card found in the Mistletoe Manor SVG Kit. I powder embossed the silver snowflakes in the background, and used Wink of Stella on the harness and antlers.
Tag 2 (Trees) is from a box card found in the Christmas Box Cards SVG Kit.
Tag 3 (Vintage Santa) is also from a box card from the same place, Christmas Box Cards SVG Kit.
Tag 4 (Snowman) is made with a cut file for a bag in the Happy Holidays SVG Kit.
Tag 5 (Wreath) is made from a card in the Silent Night SVG Kit. The wording and to/from elements were added in Photoshop, and then I used print-2-cut to cut it out.
Tag 6 (Stocking) is from a box card in the Silent Night SVG Kit
Tag 7 (Mitten) is revised from a box cut file found in the Santa's Sweets SVG Kit.
Tag 8 (Gingerbread Man) was also a box cut file in Santa's Sweets SVG Kit.
Tag 9 (Sled/Skates) is not so much Christmas as it is winter, but it still fits fine for the Christmas holiday. It is from a lever card found in the Winter Gazebo SVG Kit.
Tag 10 (Toy Soldier) is a gift bag from the Big Christmas Gift Bags SVG Kit. I used only one of the three, so had to do some manipulating because the three soldiers were all welded together.
Tag 11 (Ornaments) is from another flat collection, Christmas in the Village SVG Collection.
Tag 12 (Reindeer) is a combination of  two kits. The reindeer is from a flat collection called Comet's Candy Land SVG Collection, and the trees from the Camp Firefly SVG Kit.


And, that's it. This was such a fun challenge, albeit a lot of work figuring out what cut files to use, what paper to use (I used 98% scraps for these projects), and what size/design to make the tags. We always learn a lot, and enjoy every minute in our challenges. If you have a Sizzix Eclips and use the ECAL software you should join us on Facebook! We have a very supportive and great group, and always like to welcome new members,  share ideas and techniques and what we make.

(click on photo for larger view)

Time to Wrap and Tag Those Gifts!


Sunday, October 14, 2018

Travel Journal (Fauxdori)

The tutorial/design of this Travel Journal Set (fauxdori) is from Paper Phenomenon. I've been wanting to make it for a while, to the point that a few years ago I gathered the supplies to make it, but when I finally went to make it recently I couldn't find what I had purchased, so had to buy some of it again. I was curious to work with Kraft-Tex (I didn't lose that), and the idea of using Heat and Bond to cover it with cardstock was intriguing.

This journal is a version of a Midori travel notebook. It contains small insert booklets that can be used, removed and replaced. If you don't want to make them, you can buy them online.

Here's the one I made. The cardstock I used was digital paper, and I added photos of the recipient's wedding into the graphics of the paper to personalize it.
The cardstock is ironed onto the Kraft-Tex, an untearable paper/fabric you can get in different colors and sizes. Heat and Bond is used to fuse it to the cardstock and it adheres really well.

The cover is a piece that is folded up from the bottom, making the outside pockets. Pockets are added on the inside cover as well.
There are three notebooks that fit inside, held in by elastic bands. This first one contained watercolor paper, as my friend is an artist and love multi-media art. I made it so that one side of the page opens up to make for a larger work surface.
The cover of each fauxdori insert has a pocket (the bottom edge is folded up to make it).


This second insert contains artist sketch paper (lighter weight than the watercolor paper, but heavier than copy paper)

And, this third insert was made with copy paper, not so much for art, but for journaling, notes, lists, etc.
This cardstock cover (printed from digi paper by Carta Bella - Metropolitan Girl) has four rows of buildings on it. I altered it to flip the bottom row of houses so that when the book opens, the pocket folds right-side up.

Elastic bands are threaded through eyelet holes in the spine that hold the inserts in place, as well as one on the back used to hold the book closed.

The cover is a bit stiffer than I was hoping for. I was thinking it would be softer and more leather like. I'm hoping overtime the paper fibers will loosen up a bit. I was also wondering how grunge paper would work for the cover, as it is not tearable either.

Thanks for taking a look. If you're interested, you can get the pattern and tutorials from Paper Phenomenon (Kathy King). Also take a look at the amazing things she designs. And, there's an amazing Paper Phenomenon Fan community on Facebook. Kathy does live youtube video get-togethers a couple of times a week as well.

Cherish and Document Your Memories!


Halloween Pumpkin Party

It's become a "thing" between my grandson and myself that I give him "silly" cards for holidays/events. It's getting harder and harder to give him something he hasn't already received. This is my most recent card, a pumpkin Halloween card. The pattern for this card is from SVG Cuts' Barn Party SVG Kit.
This is a box card, so is about 2-3/4" from front to back, but it folds down flat for mailing.
The little treat bag on the front is from SVG Cuts' The Candy Gang SVG Kit. The pattern size is about about 4.5" tall, but I made it at 1" tall for the card. All cuts were made with my Sizzix Eclips2 electronic cutting machine.
I designed the back in Photoshop and did a print-2-cut, with a little Wink of Stella added to the flying pumpkin bats and the spider for some sparkle.
The thing that makes this one a bit fun and special is that I've added a sound chip into the back section of the box card. I took the instrumental portion of Teddy Bear's Picnic, changed a few of the words around to make it a pumpkin theme, then recorded myself singing the new lyrics. I then transferred the audio onto the chip (instructions to do so come with the chip that I purchased from Invite by Voice) Here's how it worked:


The tricky part about adding this audio chip was that the music is activated by a light sensitive sensor. And, box cards don't close up like traditional greeting cards so too much light was filtering through. It would just start playing arbitrarily, and not necessarily when I opened the card as in the video. Took a bit of sitting around, mulling my predicament. When working properly, the song plays one time and then stops. When the card is closed it won't play the music, but when you reopen it, it will play again.

It finally came to me that I somehow needed to shade the top of the sensor. I devised this very simple fix. I took a piece of scrap paper about an inch wide and 1.5" tall. I didn't measure it, so I'm guessing that's about what it was. I folded about a quarter inch on the top/short side three times, rolling then gluing the top most portion to the large area.


I glued it to the back of the second insert so that when the box card closes, the little overhang ends up just above the light sensor. Success! So glad it worked. 
When closed you can see how the insert is covering the area of the sensor.

And, that pretty much does it. Except one thing. I couldn't just put the card in an envelope without possibly smashing the electronics and the mini treat bag. I finally decided I needed a sturdy box in which to mail it. I couldn't find anything that would work, so I made a box to fit it perfectly from chipboard. The top fits on snugly, so there's no chance of it coming off.

Lastly, I need to find one very small piece of candy for the little treat bag on the front of the card.
Happy Halloween and Have Fun
Trick or Treating with Your Favorite Lil' Pumpkin!