Thursday, December 12, 2013

December 2013

Today I'm sharing some Christmas projects, both old and new. This is the Classic Advent Calendar from SVG Cuts. I made this in 2011; it was one of my first paper projects. But, making it with my sister-in-law made it a bit less daunting. This was actually the second one I made. The first was made with Christmas papers (click here to see Christmas style). I made it for my daughter and son-in-law, and thought that the black and white might fit better with their life style. Of course, my daughter now wants her own, and wants it in more traditional Christmas papers! The finished size is 11.5"x11.5", and the windows are about 3/4" to 1" deep.
This is a tri-fold Christmas gift card holder. This came from the Everyday Winter Cards SVG Kit. It holds one gift card, but I revised the inside and made pockets for three additional cards. And, of course, I made it more Christmas themed, instead of the beautiful winter theme as shown on the website.
Here are a couple of small gift boxes I made; one was for a chocolate swap. It was the perfect size. And, the main box is only one piece, and comes with this optional see-through window on top. It's so quick! It's from the Christmas Open House SVG Kit. The finished size is 3.5"x5.5"x1.75".
Lastly, I'm sharing some boxes I made for some Christmas gifts this year. They were from the Gift Boxes SVG Kit. I made the tall box, which is 4x4x8. However, I needed it to be 10" tall, so I just duplicated the main box piece, placed them on top of each other, scooted one of the pieces up two inches, and then welded them. It worked out perfectly for what I needed it for. I also added the panels myself, and they happened to reinforce the box which made it feel a bit more sturdy. The bases of all of the boxes are A/C cardstock, and the patterned papers are all digi papers from Jessica Sprague.
Thanks for letting me share some of my holiday projects!


Merry Christmas 2013!

Wednesday, November 13, 2013

Fall Projects/Cards

The name of the project denoting "Fall" is a bit misleading. These are projects that were done in the fall, but living is Southern California, it doesn't feel like fall. In fact it was so warm today I was shocked when I walked outside. But, let it be said, I love the real fall, the one with cold, crisp days and the turning colors of the leaves.
This first card was made for my mother-in-law, and is a pattern from the 5-Minute Cards by SVG Cuts (my fave spot for cut files by far).
These cards really are so fast to make. As most of you know, it takes more time to pick out the paper than to make the card.  Nine cards come in the kit, and they are all quick and so practical. I used an Epiphany Craft small round embellishment for the centers of the flowers.

This is a fun summer card that I made for my brother's fall birthday. It also comes from SVG Cuts, in their Surf Shack SVG Kit. Super easy, again choosing of the paper being the most time consuming part.
Take a look at this kit. It has an old-style VW bus box that is just darling.

And, another birthday of a friend coincidentally the same day as my brother. She loves anchors, which I didn't know when I made this card for her. I also made a matching gift card box, which is so easy, and has a little insert where you can insert the gift card.
This card comes from the High Skies SVG Kit. It's a gatefold card, with lots of fun layers. The gift card box, which is becoming a staple for me, is from the My Day With Dad SVG Kit. I love choosing my own papers and themes to use on all of these cut files. They are all so versatile. 

Here's an easy and fun card that I made for a good friend's birthday. Just bright and cheery. The opening fold is on the top. This one comes from the Ice Cream Birthday SVG Kit.
One more card, this one made for my niece's birthday. After I made it i thought I'd save it for her wedding, but I was too excited so I had to just give it to her. I love the old vintage look the most. It's my very favorite. I've shown this card in another post where I did give it as a wedding card. It's from the Attic Treasures SVG Kit. It comes with a little template so that you can center and cut out your photo to fit the little frame.
Lastly, here is a box I made from the Big Boutique Boxes SVG Kit. I resized it down just about 4%, and it fit my gift just perfectly. I made the tag from some free printables I found on the web and Photoshop.  Again, the vintage look is so my fave!

Thanks for taking a look.

Happy Fall! Think crisp and cold!

Sunday, November 3, 2013

And They Said "I Do"

I have had the privilege recently to help do some graphics and crafty projects for the wedding of my dear friend's son and his fiance. It turned into one of the most beautiful weddings I've ever attended, as well as one of the largest, with near 250 guests.

We started off with the bride's shower (I've changed the name on items to give her some privacy).  The shower invitations were designed by my friend, MOTG, and myself. They were designed in Photoshop, and die cut on my Sizzix Eclips. Then we added a little die cut flower at the waist for some dimension and added cuteness.
At the shower, we set out some cute cards we made, and a little instruction card asking the guests to think of fun dates that the newlyweds could go on. We made three different valued cards, so if they are feeling like they don't have a lot of cash to spend, they can go to a free card. If they have about $20.00 of $50.00 available, they can pick a $20.00 card or a $50.00 card for fun ideas that would meet their budget.
 Next was a little guessing came, where the guests had to guess what ten items the bride would take on her honeymoon.
The hostess organized other games, as well as having a Pinterest field day on the yummy treats that were served.

I made a card for the bride. The carriage image from the Silhouette Store. The little tag came from Carte Bella's Paris Girl Element Pack 1. I changed out the color to match the colors used in the card, and did a print-to-cut on my Eclips. Also used a dotted swiss embossing folder for the background.


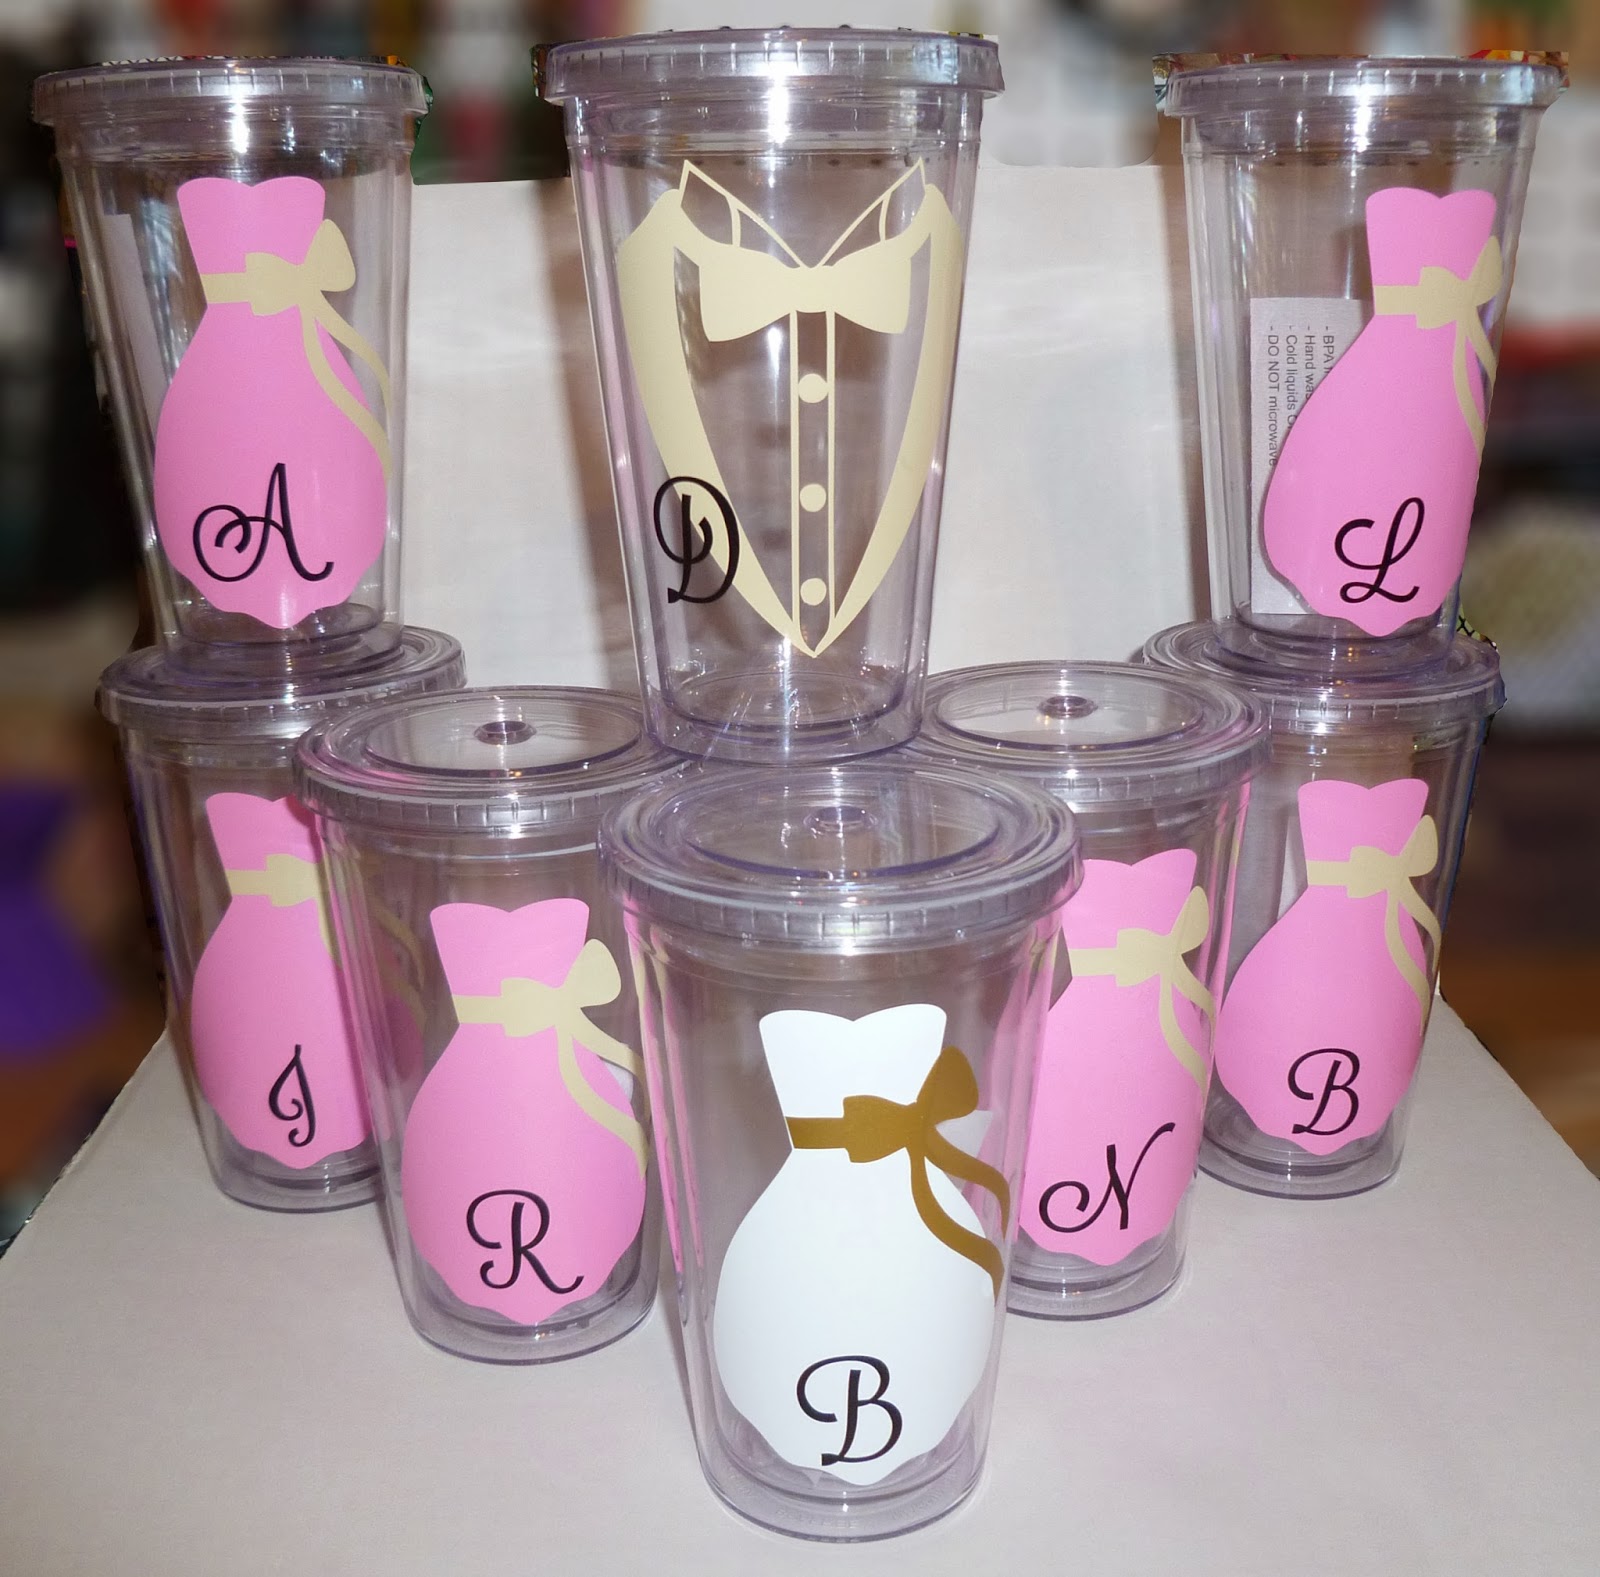
In preparation for the wedding, I cut vinyl for a bunch of tumblers (all the girls in the wedding party). She had a white dress for the bride, pink dresses for the brides maids, beige dresses for the mothers of the bride and the wedding coordinator (a dear family friend), and some little girls dresses for the flower girls. Each had their initial on them so they could easily locate their own cup.

the big girl tumblers
the mom tumblers

the little girl tumblers

As people entered the wedding venue there was a large bookcase, and the guests were to find their name on a book binding indicating at which table number they would be sitting. I used my Xyron to make these into a sticker to apply to the book bindings.
Another really fun element idea the bride and MOTB had was to make table numbers that corresponded with the chapters from the bride's favorite book, Little Women. We chose a shape and I took the chapter number, name, and a portion of text from each chapter of the book, and matched it with the table numbers. So, if you were at table one, in the background you would see Chapter 1, Playing Pilgrims, and then the words from that chapter of the book that would fill the rest of the outline.
 I cut out the numbers, backing and fronts, and the MOTB took them and spray-painted the numbers gold. She then inserted floral wire, and they were inserted into the floral arrangements on the tables. 

Also on the tables we made thank you cards for each place setting. They were tucked into the napkins so you could see them peaking out at the top.
And, I made coordinating place cards for those at the head table.
And here are the tables all setup.
And lastly, here's the card I made for their wedding gift. It's from SVG Cuts' Attic Treasures SVG Kit. I used Jodie Lee digi Vintage Collage Paper and Graphic 45 Olde Curiosity Shoppe paper for the accent paper, as well as some brads from My Minds Eye's Indie collection.
Thanks for hanging in there and letting me share my most recent projects. It was so much fun. And I'm ready to move on to new projects for Christmas, and then my sweet niece's wedding which will occur next year.

Love is in the Air!


Monday, September 30, 2013

SVG Cuts - The Little Company That Won!

If you've been a follower or friend of my blog, then you know that about 98% of all of my posts are of paper crafts that I have made with patterns from SVG Cuts. This little company is based in the home of Leo and Mary Kowal, in St. Charles, Illinois. Mary makes the awesome patterns for all of the projects you see on my blog. You'll notice all of the links are to their website.  Leo takes care of the technical side, working on the website, keeping up on their FB page (with over 33,000 followers), photographing, videoing and talking with us directly when we need our hand held to figure something out. They work long hours to present us with an entire set of projects pretty much every week, all the while tolerating all of us fans trying to hurry them up and asking for hints about what the new kit is going to contain. Their generosity is beyond amazing. They have really turned their little community into a fairly large family of creative crafters, full of fun, support, loyalty and sharing like no place I've ever seen.
Over the past month we have all been voting, as Leo and Mary's company was a nominee for the Martha Stewart American Made awards. There were six categories, and they won the craft category. Then, with one more week of voting for the Grand Prize Winner, the SVG Cuts fans pulled through again and our favorite couple won the grand prize. They get to meet Martha Stewart in New York in a couple of weeks, during which time, by the way, they will be on their honeymoon!

So, I just wanted to share with you this amazing company, SVG Cuts, and their wonderful owners, Leo and Mary, and congratulate them on this awesome acknowledgement of their hard work and talent. Oh, and on their recent marriage too! Take a look through my blog to see some of the cool projects they have designed. And, visit SVG Cuts on their website and take a browse, and also come play with us on their FB page!


 CONGRATULATIONS, MARY AND LEO!


Sunday, September 15, 2013

Summer Flowers and Cards

Seems like summer came late for us in San Diego. The entire summer passed with mild weather, until the very end of August and into September. Then the heat overwhelmed us. It makes a person lethargic, and gives us an excuse not to go walking because we "don't want to overheat the dog," because, as you know, dogs don't sweat to stay cool, they pant.

I'm just going to share a few of the things I have worked on since my big baby shower project. I had a sis-in-law's birthday, and she had requested some roses. Here they are. They came from SVG Cuts' Mom's Garden Gifts SVG Kit. I previously made them in pinks, but I really love them in the reds.  The vase was etched with a file from the Sil store, but the flowers were replaced with Mickey heads. My sis-in-law and family are huge Disney fans.

Next, I have made this next card for three totally different occasions now (birthday, sympathy and wedding). I just love how it turned out. I even had a relative who has requested it for their next birthday, a year away (yup, the same person for whom I made the above red roses). The pattern for the card came from the Home for the Holidays SVG Kit. I changed it up a bit, and added the little Queen Anne's lace flowers from 3D Flowers SVG Kit Part II. The paper is from Graphic 45 Bird Song. It's a gorgeous paper pack. The card is sitting on a pink envelope.
 The last thing I'll post today was a little shoe that was made during a promo for SVG Cuts. They provided the pattern for this shoe to anyone who wanted to make it. It came from the wedding kit named Love Always SVG Kit. We were asked to make it in any papers/embellishments, etc. that we wanted. We posted it, and emailed Leo, and received a gift card for participation. Seems as if over 600 of us made the shoes! I think that kept Leo busy for a couple of weeks. You can go to SVG Cuts Facebook page and look some of the submissions. You will be amazed at how intricate some are. Mine is a pretty simple one comparatively.
Well, that's all I have to share today. Hope you are all having a great summer, and that fall will soon be upon us. Looking forward to cooler crisp weather and wearing a hoodie.

Dreaming of Autumn

Sunday, August 11, 2013

Baby Shower

My friend and I hosted a baby shower for one of our former co-workers. It was such a fun day. I got the fun job of all things graphic design and paper crafting.
The invites turned out darling. I got the idea of the writing from a wedding shower invite on Pinterest. I designed the rest of it. On the upper umbrella, I added a print-and-cut overlay of the umbrella with pop dots to give some dimension. (information has been altered for privacy reasons)
My favorite item was the topiary center piece. The pattern came from SVG Cuts Thank You For the Music SVG Kit. I love the way it turned out. The 3D Bow is a freebie file from SVG Cuts. Go get it for free!
The paper for the vase is digi paper from Echo Park's Victoria Garden. The hanging embellishments are made two-sided so the string can go in between. One is the umbrella that I made. The rattle and B block are digi elements from Cosmo Cricket's Ten Tiny Toes Candy Candy. I copy/flipped them, then replaced the wording so it read correctly from both sides. I used the print & cut function on my Eclips to cut them out.
I added more items for the umbrella-themed shower. This is the baby buggy from the Bundle Of Joy SVG Kit. I designed the umbrella paper myself, using the umbrellas I made for the invite. Also, put some little holes in the white border to give it an eyelet look.

Then there are the candy bowls I made. These were a bit tricky. I found a few cut files for 3D umbrellas, but just couldn't make them work. I decided to alter a file I had previously made. So, I took the acorn from Acorn Autumn SVG Kit.
I used only the bottom. And, then I revised it. It worked out well because the bottom of the acorn can be pushed in, which makes a flat bottom for setting it upright. I cut off the top section, and then cut the scallops for the umbrella. I cut a simple handle and used around 4 layers of it so it would be stiff enough to stand up. Then cut a circle with a slit in the center that would fit into the bottom of the umbrella. Made the bottom of the handle so it opened like a brad at the bottom, and put it into a slit in the circle. Then glued it secure to the bottom. Here are some pics of the result. (perfect for M&Ms!).

Next I made a couple of simple gift card boxes. These one-piece boxes assemble quite easily, and with the addition of some acrylic sheeting (you can use cut up page protectors also), they are so cute. The box came from the My Day With Day SVG Kit. There is an insert in the box with tab cut-outs so you can securely insert a gift card.  The flower was a simple one, the Batini Mum from the 3D Mums and Fall Flowers SVG Kit. I added a matching pearl-type embellishment for the center.
For the "take home" hostess gift, I made some baby doll booties. I filled them with butter mints. I used the paper I designed again on these. They are so sweet. 
On the top strap of the shoe, I did another print & cut using the top portion of the umbrella (same ones from the invite). I added the wording "Thank You" and cut a bunch out all at one time. The P&C cut perfectly, as you can see from the mat. The umbrellas are on the top of the mat (about 3/4" across), and the card stock that I cut them from is on the bottom. It cut them out perfectly with my Sizzix Eclips. I used a little piece of a foam circle to attach to the shoe and pop them up a bit.
I decorated an acrylic drinking cup for the mommy-to-be. You know how thirsty mommies get. This was cut from outdoor vinyl, so it should be pretty permanent. She used it throughout the shower. The pattern is a doily that came from The Doilies SVG Collection. I totally took the idea from KimberlyRae at Kreations by KimberlyRae (with her permission, of course). You should check out her blog. She is so talented! 
Next is a cupcake box from SVG Cuts 3D Numbers SVG Kit. Instead of cupcakes, I inserted a onesie with a washcloth pushed up through the middle to look like a cherry on top. This box turns out sturdy and goes together so cleanly. There are three sizes of cupcake/muffin hole inserts to choose from.
Lastly, I made a banner...a clothesline with little girl clothing. Here's a photo of the table with some of the items. My daughter made darling umbrella cookies, and my co-hostess' daughter made such a darling baby shower cake with a cute umbrella on top. Click on the photo for a larger view.
  I think that does it! It turned out to be such a fun day. Thanks for taking a look.

Showering you with lots of happiness and babies!