Sunday, October 14, 2018

Travel Journal (Fauxdori)

The tutorial/design of this Travel Journal Set (fauxdori) is from Paper Phenomenon. I've been wanting to make it for a while, to the point that a few years ago I gathered the supplies to make it, but when I finally went to make it recently I couldn't find what I had purchased, so had to buy some of it again. I was curious to work with Kraft-Tex (I didn't lose that), and the idea of using Heat and Bond to cover it with cardstock was intriguing.

This journal is a version of a Midori travel notebook. It contains small insert booklets that can be used, removed and replaced. If you don't want to make them, you can buy them online.

Here's the one I made. The cardstock I used was digital paper, and I added photos of the recipient's wedding into the graphics of the paper to personalize it.
The cardstock is ironed onto the Kraft-Tex, an untearable paper/fabric you can get in different colors and sizes. Heat and Bond is used to fuse it to the cardstock and it adheres really well.

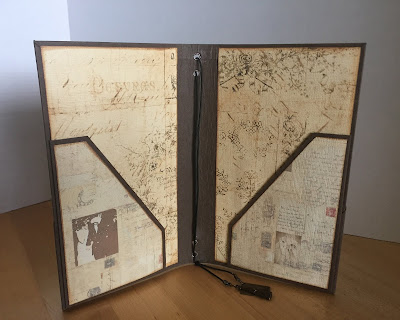
The cover is a piece that is folded up from the bottom, making the outside pockets. Pockets are added on the inside cover as well.
There are three notebooks that fit inside, held in by elastic bands. This first one contained watercolor paper, as my friend is an artist and love multi-media art. I made it so that one side of the page opens up to make for a larger work surface.
The cover of each fauxdori insert has a pocket (the bottom edge is folded up to make it).


This second insert contains artist sketch paper (lighter weight than the watercolor paper, but heavier than copy paper)

And, this third insert was made with copy paper, not so much for art, but for journaling, notes, lists, etc.
This cardstock cover (printed from digi paper by Carta Bella - Metropolitan Girl) has four rows of buildings on it. I altered it to flip the bottom row of houses so that when the book opens, the pocket folds right-side up.

Elastic bands are threaded through eyelet holes in the spine that hold the inserts in place, as well as one on the back used to hold the book closed.

The cover is a bit stiffer than I was hoping for. I was thinking it would be softer and more leather like. I'm hoping overtime the paper fibers will loosen up a bit. I was also wondering how grunge paper would work for the cover, as it is not tearable either.

Thanks for taking a look. If you're interested, you can get the pattern and tutorials from Paper Phenomenon (Kathy King). Also take a look at the amazing things she designs. And, there's an amazing Paper Phenomenon Fan community on Facebook. Kathy does live youtube video get-togethers a couple of times a week as well.

Cherish and Document Your Memories!


Halloween Pumpkin Party

It's become a "thing" between my grandson and myself that I give him "silly" cards for holidays/events. It's getting harder and harder to give him something he hasn't already received. This is my most recent card, a pumpkin Halloween card. The pattern for this card is from SVG Cuts' Barn Party SVG Kit.
This is a box card, so is about 2-3/4" from front to back, but it folds down flat for mailing.
The little treat bag on the front is from SVG Cuts' The Candy Gang SVG Kit. The pattern size is about about 4.5" tall, but I made it at 1" tall for the card. All cuts were made with my Sizzix Eclips2 electronic cutting machine.
I designed the back in Photoshop and did a print-2-cut, with a little Wink of Stella added to the flying pumpkin bats and the spider for some sparkle.
The thing that makes this one a bit fun and special is that I've added a sound chip into the back section of the box card. I took the instrumental portion of Teddy Bear's Picnic, changed a few of the words around to make it a pumpkin theme, then recorded myself singing the new lyrics. I then transferred the audio onto the chip (instructions to do so come with the chip that I purchased from Invite by Voice) Here's how it worked:


The tricky part about adding this audio chip was that the music is activated by a light sensitive sensor. And, box cards don't close up like traditional greeting cards so too much light was filtering through. It would just start playing arbitrarily, and not necessarily when I opened the card as in the video. Took a bit of sitting around, mulling my predicament. When working properly, the song plays one time and then stops. When the card is closed it won't play the music, but when you reopen it, it will play again.

It finally came to me that I somehow needed to shade the top of the sensor. I devised this very simple fix. I took a piece of scrap paper about an inch wide and 1.5" tall. I didn't measure it, so I'm guessing that's about what it was. I folded about a quarter inch on the top/short side three times, rolling then gluing the top most portion to the large area.


I glued it to the back of the second insert so that when the box card closes, the little overhang ends up just above the light sensor. Success! So glad it worked. 
When closed you can see how the insert is covering the area of the sensor.

And, that pretty much does it. Except one thing. I couldn't just put the card in an envelope without possibly smashing the electronics and the mini treat bag. I finally decided I needed a sturdy box in which to mail it. I couldn't find anything that would work, so I made a box to fit it perfectly from chipboard. The top fits on snugly, so there's no chance of it coming off.

Lastly, I need to find one very small piece of candy for the little treat bag on the front of the card.
Happy Halloween and Have Fun
Trick or Treating with Your Favorite Lil' Pumpkin!