
This project is for my 4-year-old grandson. He gave me a list of what he wanted. This included:
1) A camera
2) With a knob to turn
3) To be able to put something in the box and have it come out of the lens.
4) It had to be "Bluey" themed.
So, here we are. I think I spent more time trying to figure out what and exactly how I'd go about this....like hours.... sleepless hours too. Most all of the pieces for this file had to be altered to make it all work. This is the SVG Cuts file for the basic camera that a friend and I made almost ten years ago.

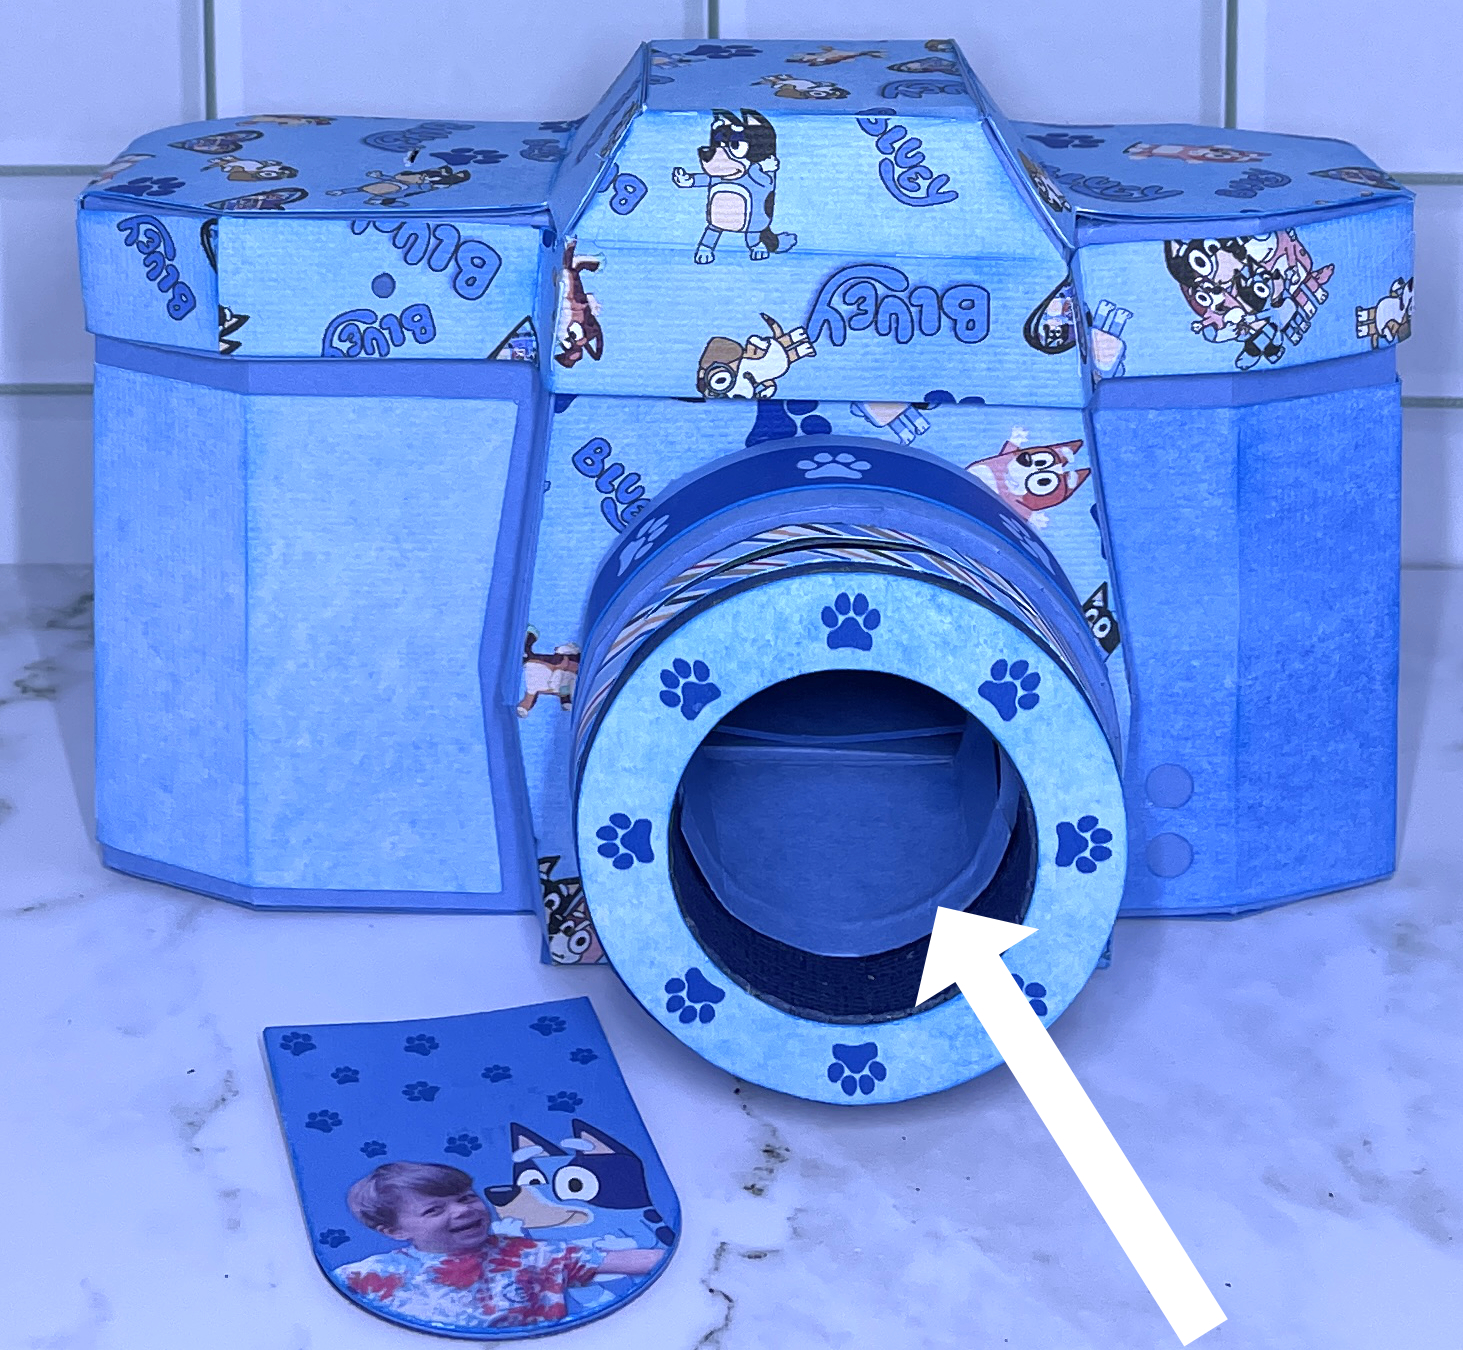
The camera lens was made without the acetate, and was opened up where it attaches to the body. There is also a little insert (four layers of card stock) that goes into the top edge of the lens to close it off so "stuff" doesn't pour out. I added some lamination to a couple of the layers by the slit so that it would withstand the insert being removed constantly.

I had to make it fit the contour of the lower part of the lens.


Camera Body:
I had to modify the bottom quite a bit. Firstly, I needed to make a hole in the front center panel so that it would be open for marbles to fall through. I made a small box (about 2"x2.5") for the center bottom that aligned with the bottom of the opening of the lens. I used small scrap chipboard pieces for the sides and back center edge of the inside so the new floor would have a place to rest to get the right angles.

I had to modify the bottom quite a bit. Firstly, I needed to make a hole in the front center panel so that it would be open for marbles to fall through. I made a small box (about 2"x2.5") for the center bottom that aligned with the bottom of the opening of the lens. I used small scrap chipboard pieces for the sides and back center edge of the inside so the new floor would have a place to rest to get the right angles.

I made a second camera bottom (two or three layers thick). This needed to be strong to hold lots of marbles. It also needed to be bent into a "V", and also be higher in the back.

I also had to put a little channel from the front hole down through the lens, again so the marbles could easily slide through.

Camera Top:
This was the part that really messed with my brain cells.😂 I had seen a video done by Sandra Createinspain (click here for her YouTube), showing how to use LED lights with an off and on button. Hers was a bit different in concept, but I decided I needed to give it a try to work with my own. This took a couple of remakes before it finally worked.


Here's a little video of how the marbles travel:
Little grandboy loved it. He spent the night tonight and played with it the entire time. Marbles were going everywhere! He kept saying, "I love my camera!" Sweetest boy ever!
This was the part that really messed with my brain cells.😂 I had seen a video done by Sandra Createinspain (click here for her YouTube), showing how to use LED lights with an off and on button. Hers was a bit different in concept, but I decided I needed to give it a try to work with my own. This took a couple of remakes before it finally worked.
If you're not familiar with them, the LED lights come in many different styles. But, they use the same principle. I used the Chanzon 3mm LED lights for this project. I've used the Chibitronics sticker LEDs for other projects. They both work great.


There's a negative and a positive that are attached to their side of the LED light, and then to their respective +- sides of the battery. I wanted to be able to turn it on and off. This required that I "break" the circuit on the positive side.
I cut some rectangles with two curved edges, and found the flattest (lowest profile) brad head I could. I glued the first four of these pieces (see photo below) for the switch in the order shown. I then inserted the brad. The three with the square cutout fit the brad nicely and it was flush to the other layers. Then I glued the fifth piece over that.
I cut some rectangles with two curved edges, and found the flattest (lowest profile) brad head I could. I glued the first four of these pieces (see photo below) for the switch in the order shown. I then inserted the brad. The three with the square cutout fit the brad nicely and it was flush to the other layers. Then I glued the fifth piece over that.

I added some copper tape on one of the curved edges (you could add to both curved edges if you wanted). I also cut three layers of the larger round cardstock circle for the top of the camera.
This is where the led light ended up. There was a fold from the top to the side of the lid, but there were no problems getting the connection. You can see where I inserted the the LED light (into the hole on the lid edge). There was copper tape as shown in the map below, the tape ending up below and on top of the prongs of the LED light. Just a note: It's highly encouraged and effective to draw a circuit map. It will help to get exactly where you are placing things, and prevent having to re-do it a second time (like I did😕).
 I inserted the braded piece up through the bottom of the lid and then through the larger circle, then fastened the brad as close and secure to the camera top as possible. I turned the top circle to make sure that the light turned on.


I made a knob out of two wooden rings, some foam spacers inside, and a little "flash" image with Glossy Accents. That was glued with strong glue to the large circles on top of the camera.

This turns and moves the inside piece (which has copper tape on one side) to complete the circuit and turn the light on or off.
On the opposite side of the lid is a hole. I reinforced this with "rings" on a number of layers. This is where you drop the marbles, then travel down and out through the lens, when opened.

When completed, there was a piece of cardstock that covered the entire inside top and electronics, including an extra tab to cover the LED chip on the top front edge.


As a side note. All of the graphics were made by me. The Bluey images were purchased on Etsy. I designed the digi paper from the images, lens circles, the marble drop ring, the lens insert, etc., and added print-2-cut images.


I'm sure there are more details, but I've probably bored any viewers well beyond what they could stand at this point.
Little grandboy loved it. He spent the night tonight and played with it the entire time. Marbles were going everywhere! He kept saying, "I love my camera!" Sweetest boy ever!
Smile! You're on Sunny's Camera!
No comments:
Post a Comment