Monday, July 23, 2018

Shine Your Light!

I made this little lantern for my great-nephew who just turned three. He had received a Cars-themed tent and sleeping bag for his birthday, so I thought this might be a fun little addition for playtime. The cut file is from SVG Cuts' Wildflower Saloon SVG Kit, from which I had previously made the quilt box and the box card.
I printed the vellum for the light portion of the lantern, but not without its trials. My printer did not want to take the vellum. I tried two different types. After thinking about it, I took an 8.5" x 11" piece of vellum and a piece of copy paper. I used my 1/4" tape runner and added a thin line of tape around the very outer edges of the copy paper, then adhered the vellum of the same size to it. This satisfied my printer, and it went through without a hitch. The vellum came off of the tape without any problems.

I always seem to make some small alteration to my projects, and this one is no different. It was made to have an electric corded candle inside. I wanted this to be more kid friendly, and to use just a tea light. So, I closed (removed nodes) the openings for the cord so it looks the same all the way around. Also, the top fits on snugly enough that the lantern can be carried around or maybe hung from the inside of his tent.

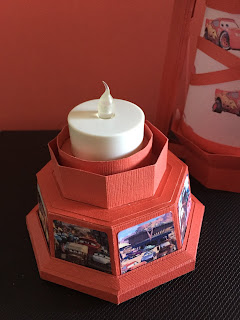
I was just going to set the tea light in the base, but it needed to be a bit higher to illuminate better. So, I found the plastic top to a medicine bottle, and covered it in red card stock with an added ledge around the top.

At this point I noticed that the tea light was about 1/8" too high for the top section of the lantern. The tea light has some little feet on it, so I set them on my ink pad, and inked the area on the top so I'd know exactly where to drill some holes.
The tea light fits snugly into the holder now. I was going to glue the holder into the lantern base, but decided not to as it is easier to take the whole thing out to insert the tea light into the holes.
The candle insert ended up being the perfect height. 
That's pretty much it. Except for one more step that I have not done before. Before attaching the vellum to the lantern, I sprayed the base, handles and top with a Minwax water based polycrylic (polyurethane) semi-gloss. It gave the paper a very mild sheen, and stiffened the card stock nicely. Since it's for a 3-year-old boy, I figured it could use a bit of added strength.

Next, I made a rotating wheel card in the same Cars theme. I designed my own cut file for this card, which is an A6 size. Used cut-2-print for the face and the spinner wheel, which I prepared in Photoshop. The rotating wheel spins to reveal four different images/sentiments in the little window.
I used Photoshop to make the inside sentiment, as well as a couple of dies to cut them out.
Happy Birthday, Greyson!
And, there you have it.  It goes into the mail today. I hope he enjoys it. 


Let Your Light Shine Bright!


Sunday, July 15, 2018

Three Babies in Two Months, and a Very Happy Grandma & Poppa

I had the pleasure to go to two baby showers recently for two lovely ladies who are sisters-in-law. Their husbands are brothers, and their mother-in-law is a dear friend.

The first baby, a girl, is about 10 days old now. She is beautiful, like her mama. I made this onesie box for her little baby. I know I've posted many of these over the years, but I love the family and story for this one, so here I go again!
I neglected to get photos of this one with the contents and ribbon, but from previous postings I'm sure you get the idea. Here are the onesies I made for this one. Each cupcake hole in the box gets a onesie with socks rolled inside to make it look like a cherry on a cupcake. In this case, I also put in a couple of headbands, which I have not done before.


The next grandbaby to be born is not going to be a grandbaby, but grandbabies! Twin boys are on the way. So, my friend will go from 0 to 3 grandbabies within about two months. Here's the onesie box for this one.
I revised the insert in this box to have only two cupcake holes, and put a pair of onesies in each. I would normally put "a name and name production," but since there are two this time I added "double feature" to it.
This second set is really special. The guitar I put on is the photo of Tom Petty's guitar. The entire family are Tom Petty fans, even to the extent that they were all in England for his concert last year. Needless to say, it meant a little bit more to them to carry on this memory. The grandparents have been fans since they were teenagers (RIP Tom).
I put a gift card at one of the corners where there is no hole, with an envelope slid inside a little pocket. And, in the other, I put a box that contains clothing rod dividers that I designed and made. They have laminate over them so they can wipe clean if need be.
I made the little box/bag to hold them, and made a traditional string-wrap closure.

Lastly I added a little enclosure card that had a little monogram (with two babies) on it, which I used in a couple of spots in the project. The enclosure card is small, about 3-1/4" or so square.
And, that's it! Congrats to this lucky family. You can imagine they are beyond thrilled.
Blessings to the growing families! Love you all!

Three Little Blessings from Up Above

Wednesday, July 4, 2018

Happy 4th 2018!

This week I made a couple of 4th of July projects. It's possible they are the first ones I've ever made. Both cut files are from SVG Cuts' Happy 4th SVG Kit

I always wanted to make this vintage marquee flag, but just never got around to it. A crafty friend posted one recently, and it brought it to my attention, so I jumped in and made it. I can't believe how easy it was, and relatively quick as well.
 
This uses a light set with 18 lights. I only had a 24 set, but it turns out I needed it because a couple of the hole spans are further apart than the lights cords would accommodate. I was glad I had a couple of extra lights so I could skip one. This happened at the bottom and top edges.

Not sure I'm crazy about the panels I used on the outside edges. I may re-cover them with a distressed wood grain. But, for now they'll do.

The second project from the same kit is this Happy 4th box card. I made it with lots of glitter card stock. Oh, and that glitter card stock is really, really thick, so I used a double-cut with my cutting machine and it worked great. 
For those of you who don't know, box cards fold flat so they can be put into an envelope. Most of the time they required large custom envelopes, so most of the patterns you find will give you the cut file for the appropriate size. Also, you will need to take it to the post office to have it posted, as there will be extra postage required since they are pretty thick and won't go into the postage machine. Most of the time I will put it in the envelope, and then into a padded mailer and mail it that way.

HAPPY BIRTHDAY, USA!


Vintage Tuscan Box Card

This may just be my favorite box card yet. I made it for my Italian Auntie, who is special to me not only because she is just lovely, but also because we share the same birthday.

The pattern for this card is from SVG Cuts Wildflower Saloon SVG Kit.  I made a lot of changes to give it the Tuscan feel I was going for.

I restructured the entire top in order to have the dimension to hang the little sign from the top edge.
I think one of my favorite parts is the panel I put at the top. The digital paper I used to make the box card is from Captured & Created Designs' Tuscan Sunset. I altered the art from one of the pages, and elongated it to fit into this spot. 
The cute little sign and grapes came from cut files from the Fruity Fiesta SVG Kit by  SVG Cuts.
Behind the sign is a vintage map of Italy.


I designed the sunflowers myself in my ECAL2 software (for the Sizzix Eclips electronic cutting machine).

Since the height of the back was increased, I needed to fill in the space at the top.

I filled it in adding some more of the grapes, and using a vine from SVG Cuts' Celeste's Cutesy Corner Elements SVG Collection.

And, lastly, the corner hinges were finished in a copper metallic finish (Color Bursts) to give it an old rusty look.

It took a long time to make this, a large reason being how long it took me to find the digi paper I wanted to use. Do you ever have those projects that you carry in your brain, mulling it over and altering it in your thoughts to try to come up with a way to make your vision a reality? This was one of those for me. My auntie loved the card, so it was so worth the effort. It's definitely one of my fave projects ever.

Thanks for taking a look!

Dreaming of the Warm Tuscan Sun