I made this little lantern for my great-nephew who just turned three. He had received a Cars-themed tent and sleeping bag for his birthday, so I thought this might be a fun little addition for playtime. The cut file is from SVG Cuts' Wildflower Saloon SVG Kit, from which I had previously made the quilt box and the box card.
I printed the vellum for the light portion of the lantern, but not without its trials. My printer did not want to take the vellum. I tried two different types. After thinking about it, I took an 8.5" x 11" piece of vellum and a piece of copy paper. I used my 1/4" tape runner and added a thin line of tape around the very outer edges of the copy paper, then adhered the vellum of the same size to it. This satisfied my printer, and it went through without a hitch. The vellum came off of the tape without any problems.
I always seem to make some small alteration to my projects, and this one is no different. It was made to have an electric corded candle inside. I wanted this to be more kid friendly, and to use just a tea light. So, I closed (removed nodes) the openings for the cord so it looks the same all the way around. Also, the top fits on snugly enough that the lantern can be carried around or maybe hung from the inside of his tent.
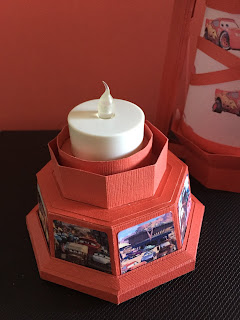
I was just going to set the tea light in the base, but it needed to be a bit higher to illuminate better. So, I found the plastic top to a medicine bottle, and covered it in red card stock with an added ledge around the top.
At this point I noticed that the tea light was about 1/8" too high for the top section of the lantern. The tea light has some little feet on it, so I set them on my ink pad, and inked the area on the top so I'd know exactly where to drill some holes.
The tea light fits snugly into the holder now. I was going to glue the holder into the lantern base, but decided not to as it is easier to take the whole thing out to insert the tea light into the holes.
The candle insert ended up being the perfect height.
That's pretty much it. Except for one more step that I have not done before. Before attaching the vellum to the lantern, I sprayed the base, handles and top with a Minwax water based polycrylic (polyurethane) semi-gloss. It gave the paper a very mild sheen, and stiffened the card stock nicely. Since it's for a 3-year-old boy, I figured it could use a bit of added strength.
Next, I made a rotating wheel card in the same Cars theme. I designed my own cut file for this card, which is an A6 size. Used cut-2-print for the face and the spinner wheel, which I prepared in Photoshop. The rotating wheel spins to reveal four different images/sentiments in the little window.
I used Photoshop to make the inside sentiment, as well as a couple of dies to cut them out.
Happy Birthday, Greyson!
And, there you have it. It goes into the mail today. I hope he enjoys it.
Let Your Light Shine Bright!


No comments:
Post a Comment